
To be prepared in case of a failure of the primary location of my Azure VM, I’ve activated the Azure Site Recovery. After completing a manual failover for testing purposes, I was surprised how much manual work was required to make the replicated setup look like the source and have all features enabled and back in place. Also the cost aspect should not be underestimated.
As a first step to become a little bit familiar with Site Recovery, I found the Microsoft learn module “Protect your Azure infrastructure with Azure Site Recovery” very helpful.
Note: This post is part of a series of postings describing several aspects I found noticeable or good to know when I recently created a virtual machine in Microsoft Azure. “Notes and Observations when setting up a Virtual Machine in Microsoft Azure” gives an overview of all parts of the series.
Ensure proper Setup: Failover Test
To make sure everything is prepared, it is recommended (and the portal is tracking it) to run a test failover, aka disaster recovery drill.
To do so, it is recommended to use an explicit testing virtual network for failover tests. This has to be located in the target location (failover direction “to”). I put it into the resource group of the target VM to ease resource cleanup.
Required manual Steps after Failover
When I did a manual failover, the new (replicated) VM did not had a public IP address. I had to create a new one, associate it to network interface, to get it attached to the created virtual machine and create a new network security rule to be able to connect via RDP.
It was also required to run a re-protect on the newly created VM, e.g. by going to the Recovery Service vault, open “Replicated Items” under “Protected Items”, select the recovered VM, and then click on “Re-protect”. Once this has completed, one have to wait for synchronization to complete.
Plus, the backup of the replicated VM had to be reimplemented. It was not created automatically by performing the failover.
I was also missing the AntiMalware-extension on the replicated VM and had to install it.
In case there was an auto-shutdown created for the source VM, also this feature needs to be created for the replicated VM.
Don’t forget: Once moved back to the initial location of your virtual machine (failback), it is required to re-protect it to re-enabled replication.
Use Azure Automation Runbooks for complex Scenarios
Even though I hadn’t tried it, I am sure it make sense to have a closer look at the abilities of runbook execution in Azure Automation in case there is the need to setup recovery for a more complex scenario than just to recover a simple, stand-alone virtual machine.
Site Recovery Infrastructure Zombies
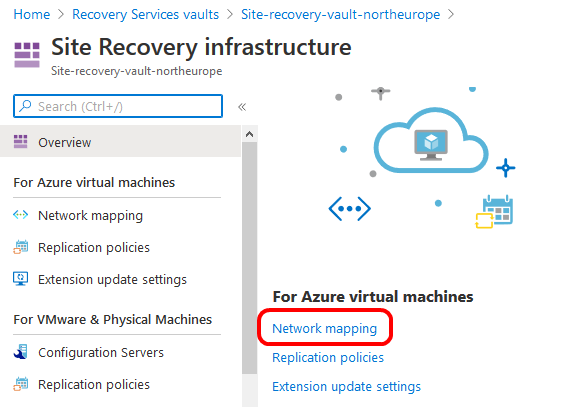
To my surprise, I found some “zombies” in the network mappings for Azure Virtual Machines of the Site Recovery Infrastructure settings of the Recovery Service vault. It listed some virtual networks for mapping, that I deleted some days ago. Unfortunately, I do not recall if and how they were connected to the recovery setup.
Because it was a little bit tricky to find the link to the network mappings, here’s a screenshot which I hope is helpful.
Protection against parallel Usage
When performing a failover, the source virtual machine will be locked. This means, you cannot start it while the recovery instance is active. To release the lock, you need to perform a failback (start failover on the recovery instance).
This is a very helpful thing I think, as it prevents you to start an instance of a service (i.e. virtual machine) that is already running in a different location. In production scenarios, this would be almost a guarantee for serious data inconsistencies.
Cost Aspect
Azure Site Recovery is not for free, at least at the time of writing. For details, please refer to Azure Site Recovery pricing.
The resources causing the highest cost for replicating my single VM, having two disks (OS and data), backup and recovery, were:
- Recovery Services vault for replication
- OS disk replica
- Data disk replica
- Recovery Services vault for backup of the replicated VM
Overall cost of my VM was nearly doubled by enabling replication. The VM was not running 24/7, but only a few hours per day, and not on the weekend. So the cost of the VM resource itself was relative low.
When preparing the series about virtual machines in Azure, I found the statement somewhere that the cache storage account used for replication will not be charged. Unfortunately, I do not recall where. Looking at my cost analysis I cannot confirm this. Also the storage account used as a temporary data store before replicating the changes to the target region causes additional cost.
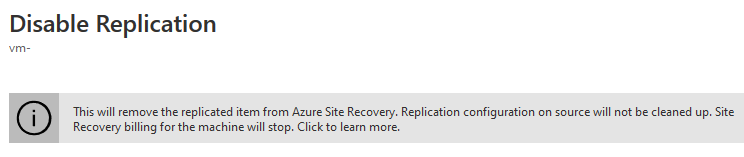
Manual Cleanup required after disabling Replication
I think it is worth to notice that disabling recovery does not remove all related artifacts.
In addition, I also found some blob containers left over within the storage account that was used as cache for replication (three of five for a VM having OS and temp disk). Unfortunately, from looking at the name or properties of these containers, it is not clear to which VM they belong. So I decided to have one exclusive replication storage account per virtual machine to ease the cleanup and ensure to minimize cost when deleting a replicated VM.
Links
Notes and Observations when setting up a Virtual Machine in Microsoft Azure
Microsoft Learn Module “Protect your Azure infrastructure with Azure Site Recovery”
Azure Site Recovery
Run a test failover (disaster recovery drill) to Azure
Runbook execution in Azure Automation
Azure Site Recovery pricing