
When you create a virtual machine in Azure based on an existing image, you cannot define the size of the operation system disk. Unfortunately, you even can’t see what the disk size will be when you create the VM. I also was not able to find a table giving this information.
Microsoft for example prepared some Windows images with smaller OS disk. When you create a new Windows VM and like to reduce disk cost, search for [smalldisk] prefix in the image name.
Change Azure Disk Size: (Seems like) There is only one Direction!
When I had a look at the cost analysis of my Azure virtual machine, I noticed that a major part of the cost was consumed by the VM’s disks. I had two of them, the OS disk and an additional data disk (for user application and data).
What I also noticed was that only 30GB of 127 were used on the OS disk, and only 2.5GB of 256GB on the data disk. I thought “What a waste of resources and money, so why not decrease the size of the disks.”
Well, trying to do so via the portal, it was clear very quickly that one cannot decrease the size of an existing disk this way. The only way here is up, means, one can only increase the disk size via the portal.
Manual Shrink of Data Disks
Next thing I tried on my Windows VM to at least shrink the data disk was this:
- Created a new, smaller disk
- Attached it to the VM, including creating a partition in the OS, and so forth
- Copied everything from the original data disk to the new one
- Detached the old disk from the VM
- Assigned the drive letter of the old disk (and its only partition) to the new one, and named the new like the old (partition label)
- Deleted the old disk
I tried this successfully with a Windows 10 machine “on the fly”, means while the system was running. Of course, all processes that would access data / files on the disk that was replaced were stopped. In case it will not work, you might try to re-attach the old disk to the VM (given you did not already deleted it), detach the new disk, change driver letter and labels back, and keep the fingers crossed this will work 😉 .
Please note that this approach is not capable for OS disks.
When I tried to detach a disk from a VM having replication (disaster recovery) enabled, I was not able to do so via the portal, even having the VM deallocated. But I was able to detach the disk using Azure CLI while the VM was deallocated (didn’t tested it having the VM running):
az vm disk detach -g resource_group_name --vm-name vm_name --name disk_name
Script-based Shrinking also for OS Disks
Then I thought I should have a look at the Internet to see what other, more experienced Azure users found out. This lead me very quickly to Jack Rudlin’s Shrink an Azure VMs OS Managed Disk using PowerShell.
Of course, I also tried this approach. Copying the disk (127GB) took a while, but it worked 🙂 .
And the very good news on this is: this solution works for OS disks too!
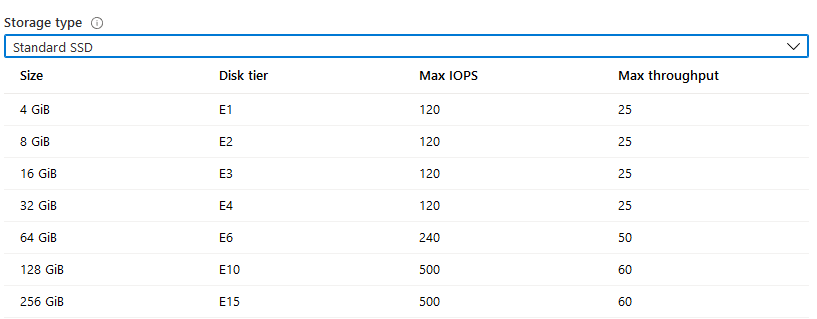
After shrinking the disk from 127GB to 32GB, I had the impression that the VM was way slower than before. Makes sense to me, because the max IOPS of a 128GB Standard SSD is 500, while the max for a 32GB disk is 120 only, and the max throughput is 25MB/second (32GB disk) vs. 60. Disk active time in task manager was very often at 100% after the change.
Minor Script Changes
The first change I had to implement was a check of the length of the generated storage account name (line 39, search for $storageAccountName = ("sashrinkddisk" + ($($... ). The name of my virtual machine lead to a temporary storage account name that was too long (25 characters, max. length is 24.).
I ran the script inside VS Code (debug), and missed the point when the check comes to see whether the VM is running before starting the cleanup (end of the script, line 156 in my version, search for start-sleep 180 or # Please check the VM is running). Not an issue for me as I did this on a temporary VM. In case you want to use the script the same way like I did (debug in VS Code), I suggest to set a breakpoint or add a line asking for confirmation, before doing the cleanup.
Conclusion
Size not only matters for Cost
When creating the disk or changing the size, keep in mind that it is not just the size you will change, but also max IOPS and max throughput, as these parameters are tightly coupled to the disk size.
Also keep in mind that you will always be charged for the next standard disk size (see Managed Disks Pricing). So it make no sense (from a cost perspective) to create a disk having e.g. 130GiB. You will be charged for the next standard size of 256GiB in this case. So either think about it if 128GiB will be sufficient, or create a 256GiB disk.
Wigh up Disks vs. Partitions
When designing the setup of a virtual machine, instead of shrinking the OS disk (which will also impact the performance) and adding an additional data disk (which again is small and therefore slow), one might think of having multiple partitions on the same (OS) disk to use the existing space. But, just because there are multiple partitions on the same disk, this will not increase the IOPS and throughput capacity of the disk. Accordingly, the decision strongly depends on the performance requirements. In case of doubt, run performance tests on various setups.
I would also suggest to start with smallest disk size / performance you think (better: know 😉 ) will meet your requirements. Depending on the criticality of the virtual machines, scale-up (increase disk size) / scale-out (add disks) is possible, but should be successfully tested and well documented before bringing mission-critical VMs to production.
Links
Jack Rudlin’s Shrink an Azure VMs OS Managed Disk using PowerShell.
Azure Managed Disks Pricing
Some background info given by ITPro Today: Guidance on disk size for disks in Azure